Sunday, December 29, 2013

Bling up terracotta with coloured stones and my Decor in a snap home

This is probably the last post for the year 2013...

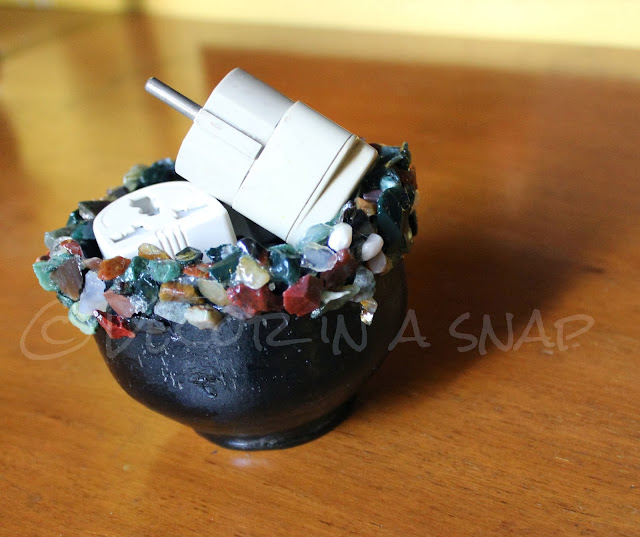
I bought this black terracotta pot off a potter in  Kodaikkanal. Love the shape of the pot, but it is a terracotta pot like any other. So I thought why not bling it up for the New Year Parties.


Here is the pot and the coloured stones I intended to use to embellish the pot. For those who live here, it is easily available at aquarium shops by the bag. I used a hot glue gun to stick these stones. Here it is midway through the project.
 

And here is the finished product. I spray varnished it to finish and let it dry for a day. I use it to corral the different plus and adapters which we need for the different gadgets we use - I can never find them when I want one. Hope this way they stay in one place! 


Some tips for those of you who wish to try this at home - Blackboard paint which is easily available in all hardware shops is great to use to paint terracotta and gives a matt finish which I like. I have given this pot one layer of blackboard paint because the pot is rather  old; I rather like its pitted appearance  - gives it some character. Use this to hold objects other than kitchenware. 

As I wind up for the year and sink into New Year prep, here are a few things which I have made and shown on this blog and which take the day to day wear pretty well. I test pretty much everything I make and then make more stuff hoping I will open a store on Etsy... maybe in 2014!

Here is a look at Decor in a snap in my home... from things that have been there for a while to the most recent which would be the angel on the Christmas tree

Here are two old cross stitch patches which I stuck on to laundry baskets using the velcro dots which I showed on my cushion post ( the last one). They've been there for a while and I love looking at them. I don't think I can do that cross stitch anymore!

 Here is the glass tray which I blinged up with some brooches and  earrings. It sits by my bedside and holds my accessories till I put them back where they belong.
And the angel - I made her by sticking a marble over part of a fancy Raksha Bandan ... don't you just love her crown?                                                                                                                                                                                                                                                                                                                                                                                                                                                                                                                                                                                                                                                                                                                                                                                                          
The hair brush container I made using coasters sits on my son's minimalistic dresser on that grunge style tray. And finally here is my custom 2014 calendar. It has funky maps of places we haven't been to yet. Yes there are many more than twelve that we have not been to but I chose the ones with nice maps.


A very happy and prosperous  New Year to all my dear readers!


Read More »

Thursday, December 26, 2013

Change how your cushion looks in a snap

I have been fascinated by the velcro dots I came across in - of all places - Health and Glow which is more a cosmetic chain store. But these dots are the handiest craft tool I have used. Here I show you how to use it (or a square of velcro cut from a length ) to change the way your cushion looks in a few minutes.


Here I have prepared a fine painting in silk to be attached to the cushion. Even though the velcro dots are self stick I added a layer of fabric glue so that it holds strong. If you are cutting lengths of velcro from a roll, it is a good idea to stitch it on so that it can be washed easily and frequently.


Here I beautified the painting and added the corresponding velcro dots.


Just velcro the picture on the cushion. This works very well with paintings and other material which cannot be washed like the ones in the picture. Just remove the painting and wash the cushion cover. If you have a collection of similar sized pictures, paintings or other craft material; prep them and velcro them to cushions for an instant, different look.


Here I must add that due to the type of material used in the accent piece (it is not washable) and due to the fact that I have added embellishments this work is best done on an accent cushion in a less trafficked area. Thanks to my readers for pointing out the practicalities of the decor ideas I put out. 
Read More »

Sunday, December 22, 2013

Mini Christmas Vignette

Merry Christmas and a very Happy New Year to all my dear readers... may the season be the best and the New Year bring Happiness and Prosperity to all of you!

Here is my mini & minimalistic Christmas tree made of a bunch of "Fancy wood sticks" which I bought from my local stationers and broke up....


Love the angels which I made from bells and beads. Unfortunately I didn't have natural wood coloured beads, but these make pretty blushing  angels don't they?


And don't miss the golden tassel for an added element of quirk - my signature !!


A Very Merry Christmas to you all!

Read More »

Wednesday, December 18, 2013

Bling up glass plates with some costume jewellery

This is one of five trays which I inherited. They are really old and gorgeous. I also inherited some of this floral costume jewellery which I never really wore so it slept in a cupboard which I dusted the other day. As with all my makeover stories the rest is in the blog post.

Here are the components of the makeover


I removed the clips and pins from behind these flowers, which is fairly easy to do with normal pliers. Then stuck it with blobs of fevibond. We here in India do not have the range of adhesives that crafters in the west have access to but with a bit of patience fevibond will do the trick. You just need to be generous with the amount ...


I have put it on my bedside table to hold my daily accessories... looks so pretty doesn't it?


Many of you have mailed me asking what adhesive I use and how it sticks. The pic below is to show that fevibond works great on metal but use it generously and leave it to set for a good four to five hours. If you are going to put it to rigorous use like the hair clips, I'd say leave it overnight. My daughter and I have both used the jewelled clips and the embellishments hold just fine. Same with the bangles.

Here you can see the bit of spillover from the fevibond. I will clean it up tomorrow when I am sure the flowers have set. Right now I was impatient to put this up so...


Read More »

Saturday, December 14, 2013

DIY bead wreaths and photoframes

Hi folks! I normally give time between posts but this was something I had to post straight away! I met my friend Janaki yesterday and she handed me a challenge along with a bag of "junk beads" as she called them. What will you do with these she said; and do a different something for Christmas as homework. Like 
Mr Spark in Noddy I said "It's a challenge! I love it!" So here is a look at what she gave me


and some junk of my own... So what should I do I thought and riffled through my junk baskets...


and came across these bag handles. Out came my glue gun and I made this wreath for the season


Here is another one


Makes a great photo frame as well!


Show me your Christmas wreath!  


Read More »

Friday, December 13, 2013

Adding bling to bangles

Every now and then I clean out my bangles and earrings and sometimes stick parts of one to another. You see some of my stuff is very old and though I don't have the heart to give them away I don't wear them either so here is what I did to two things I was not wearing for a while...


Here are some old metal bracelet which I have not worn in years because I have simply lost the patience required to clip it on! Believe it! And here are some wooden bangles which I do wear. But then I thought what if I could wear them together. So I took out my trusty pliers and clipped off the side strings and stuck them to the bangles.


Another look? I think it looks so pretty. I am already lining up a dress to wear these with. What do you think?


I also dismantles a couple of old earrings and turned them into attractive hairpins. I have done some in an earlier post, but these are a lot more dressy..your thoughts? 


Write and tell me what you think


Read More »

Sunday, December 8, 2013

Make a wall hanging easily with different materials

After I did that denim bag I was left with three more pictures that I had picked up from Bangkok. So I lined up some materials which are suitable to my instant decor frame of mind and got down to business.
Here is a look at the materials...


A burlap runner which I had bought a while ago, a dandiya stick and of course my stitching kit and some raffia or "sanal" as it is called here, to hang the whole thing with.


Here is a look at the project halfway through. It is a good idea to stick the pieces with fabric glue to the runner  so that you fix the places and make it easy for you to sew it. You could also choose to simply stick it fully with fabric glue and not sew at all. I chose to sew the pieces because the runner is not tightly woven as you can see and the glue will spill over at the back and become messy.


Once done, I just folded the top over, sewed it like you would do the top of a curtain and ran the dandiya stick through it. Finally I attached tied some sack thread or "sanal" to both ends and voila! wall hanging ready in an hour.


Read More »

Wednesday, December 4, 2013

Midweek DIY - 2014 calender

This one is so simple it is laughable.. but totally worth the time spent on it. I wanted to do a simple, functional calender for my tennis crazy son. He likes to watch all major (and sometimes minor) tournaments which are played throughout the world year round  and likes to keep track of the top players. So I downloaded this simple calender from http://calendarworkshop.com/ and then went to work on it. Take a look at what is possibly the simplest DIY calender in the world.


I got my son to name the top 12 seeded players, downloaded action images (which he loves) and also downloaded the ATP match calender. These I took to pixlr and worked on. Pixlr is easy to work on for people like me who are not into graphic design big time. It was a snap watermarking and adding tournament names. For good measure I threw in family birthdays and it was all done.


Together we went to the stationery shop and picked out textured matt paper in light khaki and printed the calender at home on our own printer. Then I swung by our mom and pop style local binder and got it spiral bound. It hangs on a simple S hook. As you can  probably see it is as home brewed as it can possibly be. None of the slickness associated with high end printing and store bought glossy calenders. 

I kept it matt on purpose and did not laminate it because I want this to be a scribble on calender where we will put in important school dates and holidays.. I will be making a custom one for my kitchen as well. A less sober version I guess.. somehow the calenders on the phone don't have this je ne sais quoi about them... what say?


Read More »

Sunday, December 1, 2013

Make a bag with old placemats

Hope everyone in the west had a great Thanksgiving weekend. I guess the weekend continues for you guys, mine is nearly over! And I present to you my Bangkok Bag tonight cos I will not have time tomorrow. Mournfully Monday! I call it the Bangkok bag because I bought the prints from Bangkok a while ago. I tried putting it on cushions and the usual but there was something amiss so I retired it for a few years. I also retired a few denim placemats because they were a bit old and we got something new and eminently more washable so here is how I put them together

And below is the DIY part. The prints, the denim placemats and bamboo bag handles. 


I first stitched on the patches, one on each side, by hand because I enjoy hand stitching in the balcony watching the sun playing hide and seek with the trees, listening to bird song... it's a cathartic experience. Anyway I broke a needle on my sewing machine when I finally stitched the place mats together and spent a good amount of time putting in a new needle after extricating it from where it had fallen into the bobbin below. Well to cut a long story short I sewed most of this one  by hand.


I trimmed the excess cloth from above to cut it into a squarish bag and used the excess to hold the handles. Since I had two patches this one is a double sided bag!


The picture above is just to show you I hand sewed it!


This is the other side. Do you like it? Do write in and tell me!

Read More »
/*facebook button*/
/*facebook button end */