Friday, December 20, 2019

Hello my lovely readers! Popping in for a short bit to bring you a quick and easy party bag or potli , using what you already have. take a look at the end product and you'll see that it's well worth the half an hour spent on it.


We all have bags in which jewellery or other precious things come. this bag actually came with a bottle of spirits believe it or not! Here below is the bag


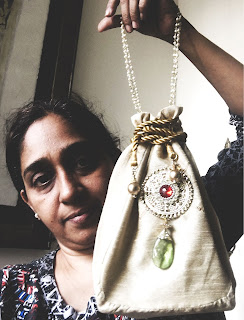
it's a pale shade of gold and I've been wanting to buy a clutch that colour for a while now and haven't found the right one. So while cleaning my bits and bobs, I found a few things which could turn this into  rather attractive potli. 


This string of 'pearls' I found at my local fancy store. these are treasure troves of all kinds of things! The disc is actually from a toran I bought a few years ago from a Mumbai railway market. Below are the tools I used


Since the pearl string has links, I put the end links into a bigger link and stitched the chain to the fabric. You will need to stitch it at various points so that it doesn't tear with a bit of weight. Then I used the earring loop shown above to keep the three strings together and stitched the tiny eye to the fabric as well. . Next, used fabric glue to stick the toran part to the centre on one side of the bag and stitched it in places as well. The key thing to note here is that everything has to be light.. these kinds of bags will tear with very heavy jewellery bits.


And here I am holding it up


Tell me how you liked this and if you have any queries on how to ! Here are two more clutches that I have blinged up with bits of jewellery.. hit me up if you feel inspired by this post!


Read More »

Wednesday, December 18, 2019


Hello everyone! Welcome back to my new old blog! 
This holiday season I bring you my handmade Christmas tree, with handmade ornaments and here I will give you an idea of how to make some of them.
Here is a look at the tree which is a foraged branch from the community garden


Here I have a scrap tassel, my favourite wire and lace dragonflies, my son’s paintings. and some felt and burlap patchwork ornaments.
First up, the body. Take a little twig, a slightly twisty part makes it more real!. Use Fevicol  and stick a bead for its head and eyes. I have stuck an evil eye 🧿. Next, take jeweller’s wire which is available in most craft shops and wind it round to the twig.


You should end up with something like this. 🖕🏽. Then apply a line oh fabric glue on each wing 


and stick the scrap of lace cut approximately like a wing. Doesn’t have to be perfect! And you have a dragonfly!


Like I said perfection isn’t the thing here! But then it is perfect!
More ornaments in the next posts! Stay tuned!


Read More »

Tuesday, March 1, 2016

Sports themed bunting

Buntings have a sense of festivity about them... I made this with things I bought from Micheal's.  It is simple to make and can be finished in under an hour. Here is the finished product, rustic as is my style.


Burlap mat stock is a very handy thing to have and is available in just the right size at Micheals. I cut the mat stock to a size which was just a bit wider than the ball and long enough to hold both the ball and brad. Then I just did a running stitch in black thread. Perfection is not really necessary in the stitches since the whole feel is rustic.


and this brad is just the right size for me to spell out my son's name on.


I threaded the individual pieces on a rough jute thread and stuck it on the wall.


Voila! Run a line of fabric adhesive along the stitches when working with burlap or any other easy fray fabric to keep it in shape.


Read More »

Saturday, February 20, 2016

Trash to treasure - continuing where I left off with my senorita series

So inspired was I by the Mademoiselle chandeliers from Lladro that I thought one up while organizing my pantry!  Had to smile at the completed figure... I guess that is what quirky designs are all about!!

Here is my maiden with Digger the doggie whom I brought back from Stamford, UK


And with Tomasino whom I brought back on a visit to  the local Swarovski store..


Who suits her better you think? I added a battery operated light at the bottom for added effect here.

Here is a look at the material I used to assemble her... The bell shaped glass is from a candle stand that came apart..a bottle and cup from the pantry and some baubles from my craft cupboard.. I didn't want to paint it all evenly - for me it is all about telling a story with the things I had lying around. Unvarnished, Un touched up, she is so full of character!


I just put one thing on top  of the other and added a crocheted coaster to finish this look.. Quirky decor is all about having fun and when you look back at your work  it should bring a smile to your lips. This did for me.. and you?


Go ahead, grab a few things, out them together and make up a story, a collage of sorts. 

Read More »

Friday, February 19, 2016

Lladro inspired senorita lights

Sometime back I received the yearly calendar from Lladro and was blown away by all their collectibles. Their chandelier, though had me spellbound. I would love to have this piece in my home by it is out of my budget so I set out to make my own rustic version with IKEA battery operated lights and a few beads and baubles from my craft basket. Here is my Senorita light set, deep in conversation!


all lit up!


Here is one of my senoritas!


 and her parts - I just used my imagination and glue gun...


And I went to town 'designing' their head gear!


 Of course it is nowhere near the real thing - jaw droppingly gorgeous but at a fraction of the price my senoritas are worth the time spent on them- don't you agree?


Find this project at DIY like a boss link party where there are a fair few lovely craft ideas.


Read More »

Sunday, February 14, 2016

Repurposing watches into quirky timepieces

In  today's world of smartphones and tablets, the watch, unless designer, is less and less used. I have a few lying around the house which keep time well but are not used. Here I show you how I have re worked them into my home decor so they still tell time but from a different backdrop. First I had my local watch store guy remove the metal straps to make it more amenable to this transformation.

I have used blue tack to fix the watch face and the backdrop (I will probably go with the funky monkey finally!) I suggest this method because you will need to change the battery sometime and blue tack makes it easy to take the watch out when needed.

Quite simply stick the watch face on the chosen objects to create quirky and fun timepieces. Here it is on a mini watering can...


on my mother of pearl spoon...
with my other tea things ...

and fixed on one of the ubiquitous coasters and blinged up!

and  practically dominating the bedside table.


On my mini watering can in my craft cupboard.


Read More »
/*facebook button*/
/*facebook button end */