Showing posts with label Decor. Show all posts

Saturday, February 20, 2016

Trash to treasure - continuing where I left off with my senorita series

So inspired was I by the Mademoiselle chandeliers from Lladro that I thought one up while organizing my pantry!  Had to smile at the completed figure... I guess that is what quirky designs are all about!!

Here is my maiden with Digger the doggie whom I brought back from Stamford, UK


And with Tomasino whom I brought back on a visit to  the local Swarovski store..


Who suits her better you think? I added a battery operated light at the bottom for added effect here.

Here is a look at the material I used to assemble her... The bell shaped glass is from a candle stand that came apart..a bottle and cup from the pantry and some baubles from my craft cupboard.. I didn't want to paint it all evenly - for me it is all about telling a story with the things I had lying around. Unvarnished, Un touched up, she is so full of character!


I just put one thing on top  of the other and added a crocheted coaster to finish this look.. Quirky decor is all about having fun and when you look back at your work  it should bring a smile to your lips. This did for me.. and you?


Go ahead, grab a few things, out them together and make up a story, a collage of sorts. 

Read More »

Friday, February 19, 2016

Lladro inspired senorita lights

Sometime back I received the yearly calendar from Lladro and was blown away by all their collectibles. Their chandelier, though had me spellbound. I would love to have this piece in my home by it is out of my budget so I set out to make my own rustic version with IKEA battery operated lights and a few beads and baubles from my craft basket. Here is my Senorita light set, deep in conversation!


all lit up!


Here is one of my senoritas!


 and her parts - I just used my imagination and glue gun...


And I went to town 'designing' their head gear!


 Of course it is nowhere near the real thing - jaw droppingly gorgeous but at a fraction of the price my senoritas are worth the time spent on them- don't you agree?


Find this project at DIY like a boss link party where there are a fair few lovely craft ideas.


Read More »

Sunday, February 14, 2016

Repurposing watches into quirky timepieces

In  today's world of smartphones and tablets, the watch, unless designer, is less and less used. I have a few lying around the house which keep time well but are not used. Here I show you how I have re worked them into my home decor so they still tell time but from a different backdrop. First I had my local watch store guy remove the metal straps to make it more amenable to this transformation.

I have used blue tack to fix the watch face and the backdrop (I will probably go with the funky monkey finally!) I suggest this method because you will need to change the battery sometime and blue tack makes it easy to take the watch out when needed.

Quite simply stick the watch face on the chosen objects to create quirky and fun timepieces. Here it is on a mini watering can...


on my mother of pearl spoon...
with my other tea things ...

and fixed on one of the ubiquitous coasters and blinged up!

and  practically dominating the bedside table.


On my mini watering can in my craft cupboard.


Read More »

Sunday, March 30, 2014

Add a touch of fun to your cupboard knobs

I have put up masks and still have a few on the walls of my home. Could,t resist picking up a couple on my recent trip to Bali but I was determined to find another way of displaying it. After more than a month, I found an interesting way to do this


Before I hung the mask on the cupboard knob, I hung a golden tassel which looks like a sort of Golden neck ornament or beard even... 


I like decor which puts a smile on my face every time...


And I tug gently at the tassel to open that shelf which is not opened every day.. so how do you like my take on decor? Write in and tell me

Read More »

Thursday, January 9, 2014

Integrating Bastar craft in home decor - DIY

Bastar art is justifiably famous. Rustic and gorgeous it embodies the simplicity of  everyday village life in India. So when I saw these panels I just grabbed them by the handful with no idea whatsoever of what I was going to do with it. 
Here I present my own versions of Bastar in everyday home decor. 


Strings of matt gold beads are very versatile and here I restrung them on a gold jewellery wire and attached them by just tying them in an ordinary rustic knot to the little Bastar panel.


I purposely used a long string because it looks so ornamental when you wrap it round. Use them as napkin rings 


or curtain ties or just hand it ornamentally on lampshades, the choice is yours.. Since I am binging big time on Tanjore beads I decided to fuse Bastar and Tanjore and see how that came out. Here is a picture. You tell me what you think of it...


I stuck on some Tanjore beads and patches and put the two together using a keyring.


Read More »

Friday, January 3, 2014

Tanjore style decor for a knocker

 Hello there! I hope you have all had a great start to the New Year.. I have been smitten by tanjore bead decor for some reason and I thought I would post this idea. This aluminium knocker was lying in my trunk where things like this lie from the time they are bought or gifted; till I figure out what to do with them. In my excitement I forgot to take a picture of the original knocker until after I applied a coat of matt black to it. Sorry about that but here is the picture at the end of the first coat


Tanjore is normally done on  gold or brass but I chose black to showcase a rather minimalistic tanjore bead decoration. So I gave the knocker two coats of black enamel paint in matt and started but gluing on a mango motif ( I got this from someone who sells a lot of tanjore work since I don't know how to do tanjore work)


And then started to stick tanjore beads -  which are rather easily available - in motifs I thought would complement the mango. So here is how that went... I like how it came out eventually.


Well, do write in and let me know how you like it. You could also use this to hang towels or napkins.


Read More »

Sunday, December 29, 2013

Bling up terracotta with coloured stones and my Decor in a snap home

This is probably the last post for the year 2013...

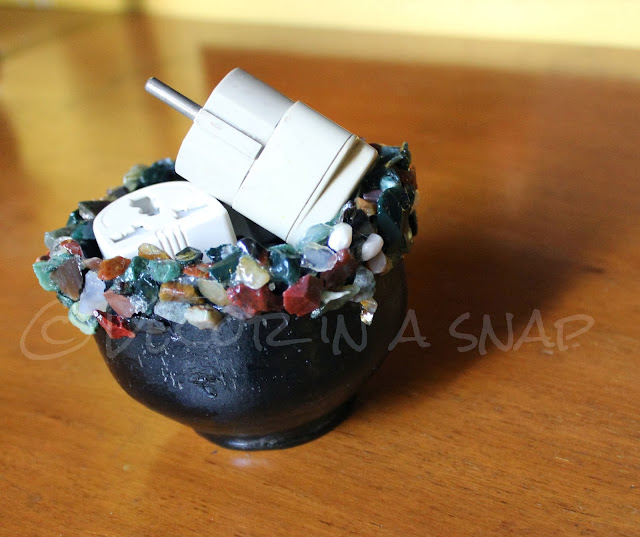
I bought this black terracotta pot off a potter in  Kodaikkanal. Love the shape of the pot, but it is a terracotta pot like any other. So I thought why not bling it up for the New Year Parties.


Here is the pot and the coloured stones I intended to use to embellish the pot. For those who live here, it is easily available at aquarium shops by the bag. I used a hot glue gun to stick these stones. Here it is midway through the project.
 

And here is the finished product. I spray varnished it to finish and let it dry for a day. I use it to corral the different plus and adapters which we need for the different gadgets we use - I can never find them when I want one. Hope this way they stay in one place! 


Some tips for those of you who wish to try this at home - Blackboard paint which is easily available in all hardware shops is great to use to paint terracotta and gives a matt finish which I like. I have given this pot one layer of blackboard paint because the pot is rather  old; I rather like its pitted appearance  - gives it some character. Use this to hold objects other than kitchenware. 

As I wind up for the year and sink into New Year prep, here are a few things which I have made and shown on this blog and which take the day to day wear pretty well. I test pretty much everything I make and then make more stuff hoping I will open a store on Etsy... maybe in 2014!

Here is a look at Decor in a snap in my home... from things that have been there for a while to the most recent which would be the angel on the Christmas tree

Here are two old cross stitch patches which I stuck on to laundry baskets using the velcro dots which I showed on my cushion post ( the last one). They've been there for a while and I love looking at them. I don't think I can do that cross stitch anymore!

 Here is the glass tray which I blinged up with some brooches and  earrings. It sits by my bedside and holds my accessories till I put them back where they belong.
And the angel - I made her by sticking a marble over part of a fancy Raksha Bandan ... don't you just love her crown?                                                                                                                                                                                                                                                                                                                                                                                                                                                                                                                                                                                                                                                                                                                                                                                                          
The hair brush container I made using coasters sits on my son's minimalistic dresser on that grunge style tray. And finally here is my custom 2014 calendar. It has funky maps of places we haven't been to yet. Yes there are many more than twelve that we have not been to but I chose the ones with nice maps.


A very happy and prosperous  New Year to all my dear readers!


Read More »

Thursday, December 26, 2013

Change how your cushion looks in a snap

I have been fascinated by the velcro dots I came across in - of all places - Health and Glow which is more a cosmetic chain store. But these dots are the handiest craft tool I have used. Here I show you how to use it (or a square of velcro cut from a length ) to change the way your cushion looks in a few minutes.


Here I have prepared a fine painting in silk to be attached to the cushion. Even though the velcro dots are self stick I added a layer of fabric glue so that it holds strong. If you are cutting lengths of velcro from a roll, it is a good idea to stitch it on so that it can be washed easily and frequently.


Here I beautified the painting and added the corresponding velcro dots.


Just velcro the picture on the cushion. This works very well with paintings and other material which cannot be washed like the ones in the picture. Just remove the painting and wash the cushion cover. If you have a collection of similar sized pictures, paintings or other craft material; prep them and velcro them to cushions for an instant, different look.


Here I must add that due to the type of material used in the accent piece (it is not washable) and due to the fact that I have added embellishments this work is best done on an accent cushion in a less trafficked area. Thanks to my readers for pointing out the practicalities of the decor ideas I put out. 
Read More »

Sunday, December 22, 2013

Mini Christmas Vignette

Merry Christmas and a very Happy New Year to all my dear readers... may the season be the best and the New Year bring Happiness and Prosperity to all of you!

Here is my mini & minimalistic Christmas tree made of a bunch of "Fancy wood sticks" which I bought from my local stationers and broke up....


Love the angels which I made from bells and beads. Unfortunately I didn't have natural wood coloured beads, but these make pretty blushing  angels don't they?


And don't miss the golden tassel for an added element of quirk - my signature !!


A Very Merry Christmas to you all!

Read More »

Wednesday, December 18, 2013

Bling up glass plates with some costume jewellery

This is one of five trays which I inherited. They are really old and gorgeous. I also inherited some of this floral costume jewellery which I never really wore so it slept in a cupboard which I dusted the other day. As with all my makeover stories the rest is in the blog post.

Here are the components of the makeover


I removed the clips and pins from behind these flowers, which is fairly easy to do with normal pliers. Then stuck it with blobs of fevibond. We here in India do not have the range of adhesives that crafters in the west have access to but with a bit of patience fevibond will do the trick. You just need to be generous with the amount ...


I have put it on my bedside table to hold my daily accessories... looks so pretty doesn't it?


Many of you have mailed me asking what adhesive I use and how it sticks. The pic below is to show that fevibond works great on metal but use it generously and leave it to set for a good four to five hours. If you are going to put it to rigorous use like the hair clips, I'd say leave it overnight. My daughter and I have both used the jewelled clips and the embellishments hold just fine. Same with the bangles.

Here you can see the bit of spillover from the fevibond. I will clean it up tomorrow when I am sure the flowers have set. Right now I was impatient to put this up so...


Read More »

Sunday, December 8, 2013

Make a wall hanging easily with different materials

After I did that denim bag I was left with three more pictures that I had picked up from Bangkok. So I lined up some materials which are suitable to my instant decor frame of mind and got down to business.
Here is a look at the materials...


A burlap runner which I had bought a while ago, a dandiya stick and of course my stitching kit and some raffia or "sanal" as it is called here, to hang the whole thing with.


Here is a look at the project halfway through. It is a good idea to stick the pieces with fabric glue to the runner  so that you fix the places and make it easy for you to sew it. You could also choose to simply stick it fully with fabric glue and not sew at all. I chose to sew the pieces because the runner is not tightly woven as you can see and the glue will spill over at the back and become messy.


Once done, I just folded the top over, sewed it like you would do the top of a curtain and ran the dandiya stick through it. Finally I attached tied some sack thread or "sanal" to both ends and voila! wall hanging ready in an hour.


Read More »
/*facebook button*/
/*facebook button end */